
How to Write Meta Title and Meta Description
Meta Title and Meta Description are HTML attributes that help search engines understand what your page is about. These elements are also displayed in search engine results, making them critical for SEO and click-through rate (CTR).
Meta Title – Best Practices
- Keep it under 60 characters.
- Include the primary keyword related to the content.
- Be clear and descriptive.
- Optionally include the brand name.
-
Avoid keyword stuffing.
Examples:
"How to Write Effective Meta Titles and Descriptions | NewsHub"
“10 Tips for Better SEO Metadata – Content Guide”
Meta Description – Best Practices
- Keep it under 155 characters.
- Summarize the page content clearly.
- Include relevant keywords naturally.
-
Use active voice and persuasive language.
Examples:
"Learn how to write effective meta titles and descriptions to boost your page visibility and CTR."
“Discover expert tips to optimize your metadata for better SEO performance.”
Where to Add Metadata in Bold CMS
- Open your story in Bold CMS.
- Manage > Show Advanced Options > Scroll to the SEO section.
- Fill in the Meta Title and Meta Description fields.
- Save and publish.

Pro Tips:
- Avoid duplicating metadata across multiple pages.
- Match metadata with actual page content.
- Review metadata regularly for updates.
How to Write Meta Title and Description for Live Blogs
Live blogs require metadata that communicates real-time updates to users and encourages clicks during ongoing events.
Meta Title – Best Practices
- Include the word "Live" or "Live Updates".
- Mention the event name or topic.
- Add the date if relevant.
-
Keep it under 60 characters.
Examples:
"Live Updates: Cyclone Michaung Hits Tamil Nadu"
"Lok Sabha 2025 – Live Election Results and Reactions"
“India vs Pakistan – T20 World Cup 2025 Live Scores”
Meta Description – Best Practices
- Start with "Follow live updates" or "Real-time coverage".
- Mention what’s being tracked (e.g., scores, results, reactions).
- Use active language to imply ongoing updates.
-
Keep it under 155 characters.
Examples:
"Follow live updates on Cyclone Michaung’s landfall, alerts, and impact across southern India."
"Get real-time election results, vote counts, and reactions from across India."
“Live coverage of India vs Pakistan T20 clash – ball-by-ball updates and key highlights.”
Using optimized metadata for live blogs helps drive visibility and engagement, especially during high-traffic news cycles. Make sure your metadata clearly reflects the real-time nature of the content.
Generative Engine Optimization (GEO)
Generative Engine Optimization (GEO) is about enhancing the visibility and discoverability of your content for large language models (LLMs) and AI-driven tools like ChatGPT, Google’s AI Overviews, and Perplexity. While traditional SEO is still vital, GEO ensures your journalism is accurately summarized and surfaced in AI answers and suggestions.
This guide outlines practical steps you can take as a publisher using Bold CMS.
1. Clarity First: Write Like an LLM Thinks
- Use clear, descriptive headlines and straightforward introductions.
- Place key facts within the first 1–2 paragraphs.
-
Keep Meta Titles simple, even if the story title is more creative.
Example:
✅ “Supreme Court Strikes Down New Surveillance Law”
❌ “The Gavel Falls Hard on Surveillance”
2. Use Structured Content in Bold CMS
-
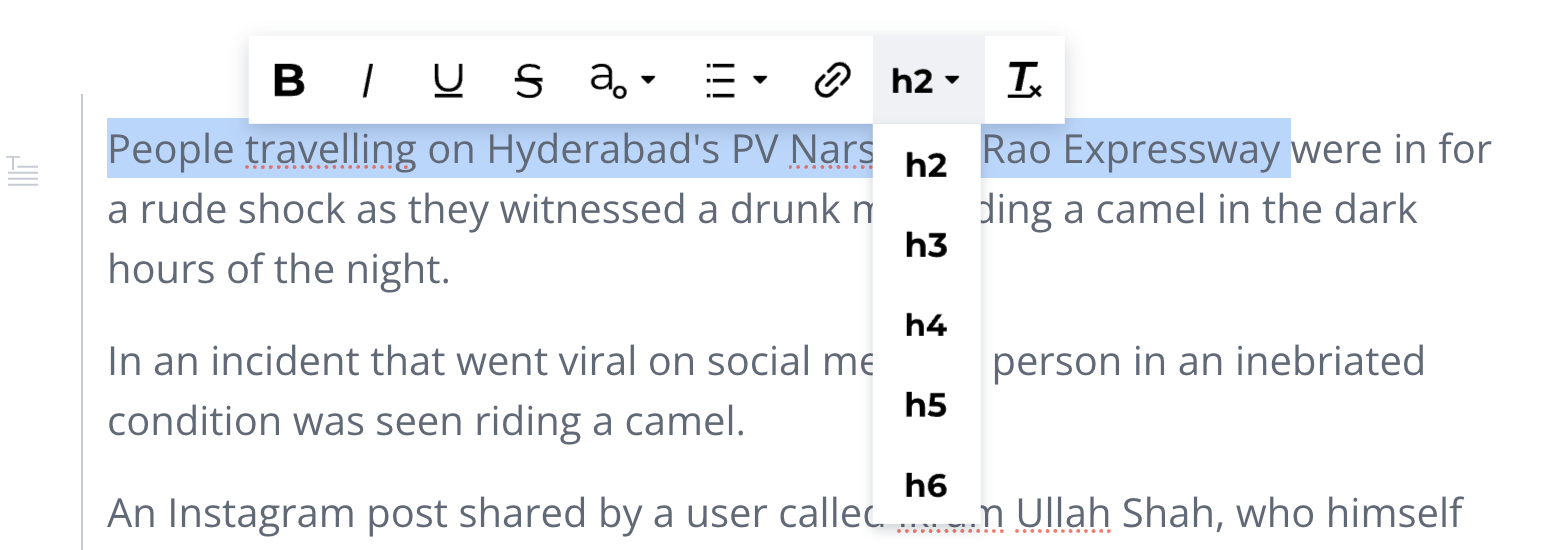
Break content into sections using subheadings (H2, H3). You can apply these by selecting heading styles in the story editor.
- Use bullet points or numbered lists for clarity.
-
Add Q&A-style sections if relevant (great for explainers).

3. Metadata That Speaks AI
- Write clear, concise Meta Titles and Descriptions for every story.
-
Ensure accurate publish and modified dates in the CMS.
Tip: You can add Meta Titles and Descriptions via the SEO section when editing any story.
4. Entity-Level Optimization
- Use full names and clear identifiers for people, places, and organizations early in the text.
- Use phrases like “Prime Minister Narendra Modi” (not just “Modi”) or “Supreme Court of India” (not just “the court”) rather than ambiguous terms.
- LLMs anchor summaries using named entities and clear relationships.
5. Answer the ‘What’, ‘Why’, and ‘So What’
- LLMs favor contextual stories over just breaking news.
-
Add brief context or explainer blocks:
“Why this matters:”
“Background:”
6. Link Smartly
- Link to credible primary sources, even in internal stories.
- LLMs check for trust signals: source transparency, mention named authors, and citations clearly to build trust.
7. Use Summarizable Language
- Summarize stories at the top or end in a paragraph or bullets – LLMs often extract these.
- “Here’s what you need to know” summaries are especially helpful.
8. Localize with Clarity
-
Be explicit about geography and relevance.
✅ “Protests erupt in Pune, Maharashtra”
❌ “Protests erupt in the city”
9. Track LLM Visibility
-
Monitor where and how your content shows up in:
Google’s AI Overviews
ChatGPT (via Bing Plugin)
Perplexity.ai -
Tools like NewsWhip, Narrato, or GrepWords are starting to track LLM mentions.
10. Protect Brand & Attribution
- Use consistent bylines, organisation name, and logo metadata.
- Consider including a Usage Rights disclaimer if needed.
Generative Engine Optimisation complements your existing SEO efforts and helps ensure your journalism is properly interpreted and promoted by modern AI platforms. Using Bold CMS, many of these best practices can be adopted with minimal effort — focus on clarity, structure, and consistency.
Mobile Browsers That Are Compatible With Bold
Bold is one of the few CMS’s that is responsive on mobile devices. Quintype encourages journalists and content creators to create content on the go.
What mobile browsers do Bold CMS support?
Here is a quick overview of the mobile browsers that Bold CMS is best suited for.
Browser Matrix Details
Browser Matrix Details
| S No. | Browser | OS | Level of Support | Screen Resolution |
| 1 | Chrome | Windows | Full | 1280x720 |
| 2 | Chrome | Android | Full | 360x640 |
| 3 | Chrome | Mac | Full | 280x800 |
| 4 | Safari | iOS | Partial | 414x896 |
| 5 | Firefox | Windows | Partial | 1366x768 |
| 6 | Safari | Mac | Partial | |
| 7 | Chrome | iOS | Full | 414x896 |
| 8 | Edge | Windows | Partial | |
| 9 | Android Web-view | Android | No Support | 360x800 |
| 10 | Chrome | Linux | Partial | 1200x800 |
| 11 | Any browser | Tablet | No support as of now |
How To Retract A Story And Set Up A Redirect
In this article we are going to focus on:
- How retraction of story works
- How to retract a story
- How to set up a custom redirect to a retracted story
How retraction of story works
The option to retract a story shows up when you have published your story once.
Use case:
When there has been any mistake on a published story that might take some time to fix, and if you wish that the story shouldn't be available to public on the website, you can go ahead and retract that story.
How to retract a story
Retracting a story is simple and involves only three steps.
- Navigate to the Story page on CMS.
- Click on the Kebab menu(one with three vertical dots) on the top right corner.
-
Choose Retract from the list of options.

How to set up a custom redirect
After a story is retracted, it is no longer available on the website. But if the user has already got access to the story via social media autopost or so, if the user clicks on the link, a 404 page appears since the story is not available on the website.
If you wish to avoid this negative user experience, you can go ahead and set up a redirect.
Here is how to do that:
- Copy the slug of the story.
- Navigate to Manage->Custom slugs.
- Click on Add New.
- Source path: Enter the entire source path(ex: https//rio-demo.web.qtstage.io/a-sample-path)
- Destination path: Mention the destination path if you wish to redirect the user to some other story/ the section page if need be.
- To redirect to home page, leave this field empty.
-
Status code: There are two types of redirect.
301: Permanent redirect.
302: Temporary redirect.
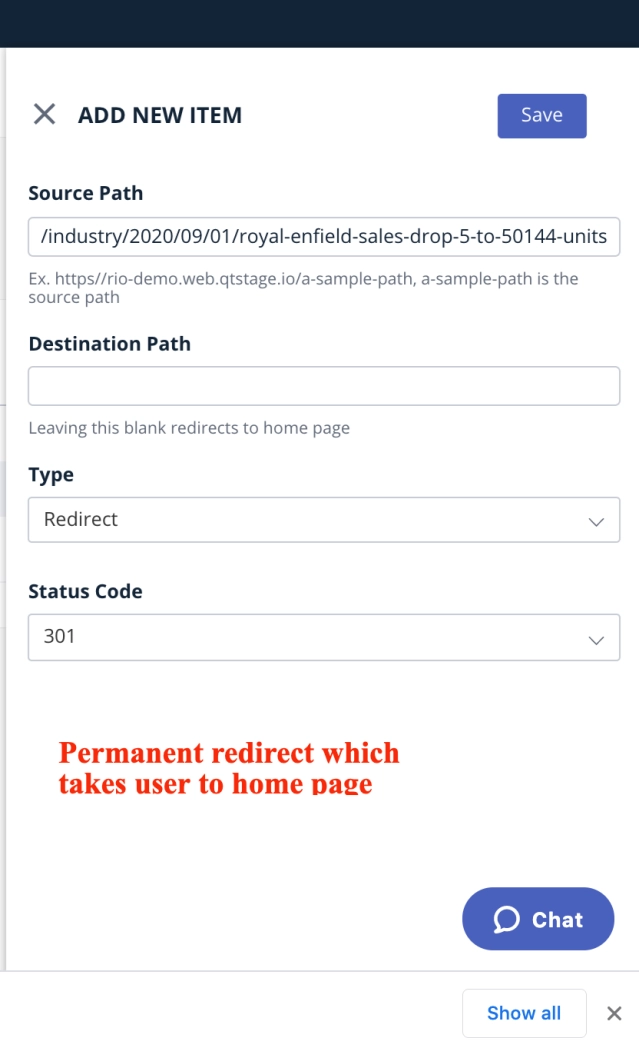
If you have permanently removed a story and wish to set a redirect to that story, you can opt for a 301 redirect- meaning the redirect is permanent.
Video Help:
Still having doubts? Refer the video tutorial below:
How To Filter Stories On Workspace And Save Filter Segments
Update Date: Filters stories based on when a story was last updated. This can be a date or a date range.
Filters option is used to narrow down the list of stories displayed depending on your requirement.
Use case:
If you'd like to see all the stories created by a particular author or a particular section, you can make use of filter option on workspace.
How to filter story on workspace:
- On workspace dashboard, you can click on "Filter" button which is on top right side of the page. Below screenshot if for reference.

- You can select any of the below filter based on the requirement.
Story Template: You can select one or more template to filter the stories to be displayed.
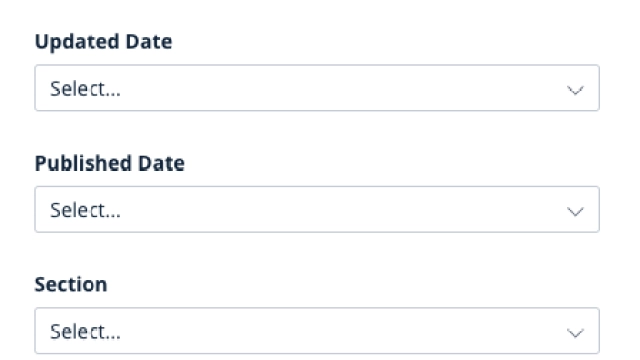
Update Date: You can filters stories based on when a story was last updated. This can be a date or a date range.
Publish Date: You can filters stories based on when a story was published.
Sections: You can select a section from the list, from which the stories should be displayed.
Author: You can filter stories using a specific author name to only display stories written by a particular author.
Attribute & Value: Select an Attribute Key and its corresponding value pair from the respective lists.
How to save filter segments:
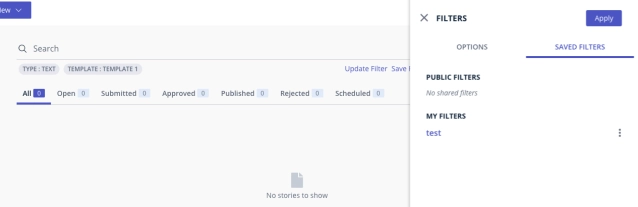
1. On workspace, click on "Filters"
2. Select the required filters
3. Click on "Apply" button
4. Once the filter is applied, you can save the filters for future reference.
5. Once is it saved, you can check saved filters under "Filters" > "Saved filters"

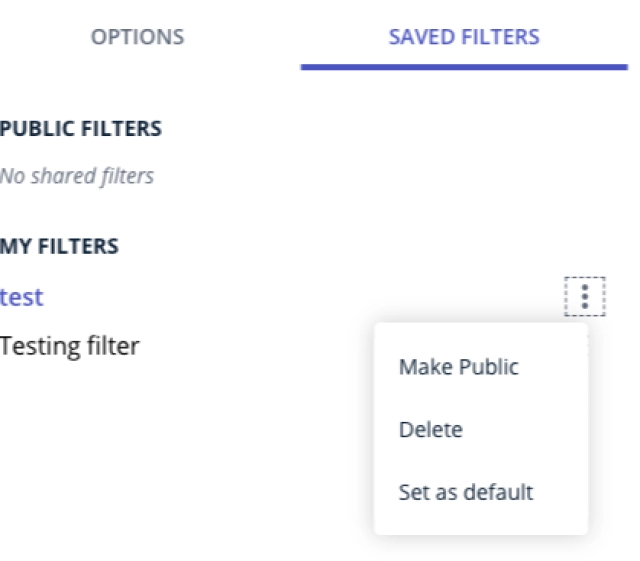
How to make filters default or public:
1. On workspace, click on the "Filters"
2. Go to "Saved filters" tab
3. Select any of the Saved filter and click on the hamburger icon(3 dots button) beside the filter
4. You will see an option to make it default or public.
How To Add Widgets To Your Website
Steps to be followed:
1. Login to the Page builder dashboard.
2. If you wish to add the widgets onto the home page, choose the option as Home page on the top left corner.
3. Scroll down on the home page to the desired position-> Click on the + button available.
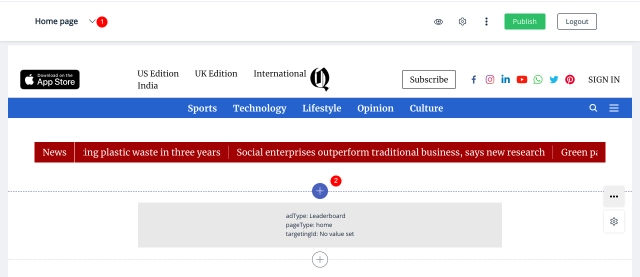
4. A popup appears with the list of templates available. On the left side, click on the layouts dropdown and choose the widgets option and close the popup.

5. To the right side of the widget added, click on the settings button:
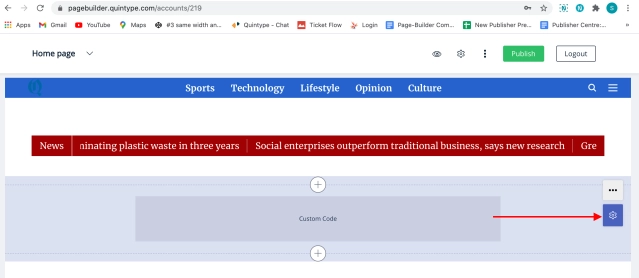
6. On the resulting popup, add your HTML code onto the Custom Code field.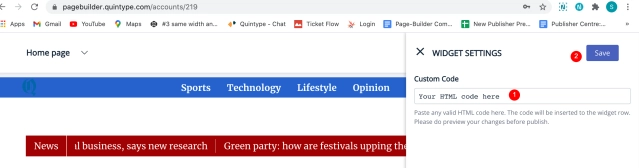
7. Save and publish the changes.
Video Help:
Here is a video that would be of help:
How To Create A Collection
What is collection?
To put in a very simple term, it is like a display board. When you create a section, by default a collections gets created i.e. A layout display board is created. The stories created under particular section gets arranged to a collection page.
For example- This is like how it happen in Newspapers, where they manually copy paste the images and stories in a particular area/column and start printing.
Automated collection
In automated collection, the publisher don't have to worry about what's the arrangement of articles in this section. It gets curated on the web page automatically.
Select the collection under content> collections. Click on settings, enter the details (Title, summary & image) for a particular collection. You need to select "Automated" from Rules.
Automated is basically you are setting the rules that stories of this tags or this particular section or these many authors articles to be added on that particular page. You just have to select the rule, update and publish so that it will showup on the frontend.
Manual collection
When you say manual, every action or the article gets added to the page based on the rankings that we do. Otherwise, I don't want any of the stories.
Content list:
This is the list that basically pulls whatever rules collection is set. I have selected a particular collection (say for example "frequently asked question"). So every article curated under this section is going to get curated here.
Sorted items:
Apart from automated articles, there are certain articles in that particular collection you want more traffic generating there. You can rank them by clicking on star icon. You can push up or down as per your wish.
It gets reflected on the frontend once you publish it.
How To Create A Live Blog
Usecase:
A live blog template can be handy when there are any current events happening and you wish to create a story around the event while it is occurring.
Example: A cricket match, election results, verdicts of important cases.
Workflow of a live blog:
A live blog follows a different workflow when compared to other story templates.
Here is how a live blog is different from other story types:
- The first time a live blog is being published, the story will go through the standard approval process that is implemented on your website.
- Once a Live Blog is published, any edits you make on the story will only require a simple Save action for the newly added content to be made available to readers of the story.
- You may choose to close the live blog after the event you are reporting is completed.
- A Live Blog is populated in reverse chronological order, meaning that each new card you add is placed in reverse chronological order immediately below the Header card containing the Title of the story.
- Cards in the story continue to be displayed in this order as long as the story is live.
- Once the story is Closed, the cards are reordered in proper chronology.
- Another important thing to note, is that if a card is pinned - that card will always be displayed immediately under the Title card, irrespective of its chronological order. This override continues even after the story is closed.
- In addition, each new card that is added also has a title container and a "This is a key event" box that can be switched on or off to highlight content in that card.
How To Create A Live Blog?
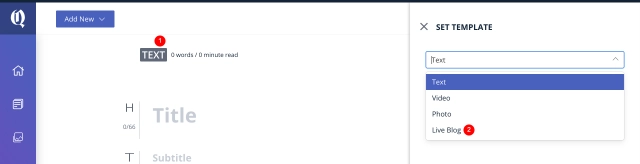
Choosing the template:
- On the dashboard, click on Add New->Story.
- On the new story page, click on the Text option on the top left corner.
-
Choose the template as Live blog from the resulting popup.
Adding cards to the live blog:
- As mentioned before, the live blog follows a reverse chronological order.
- This article displays an example of a live update about a cricket match.
- Here is how the cards can be added and how they are reflected on the website:
- On the bottom of the story, click on Add card button.
- Add a few cards with the necessary content, save and publish the content.
NOTE
The blog goes through the publishing process only on the first time. All changes done after the initial publish are immediately reflecting on the story in the frontend.
Adding key events:
If you wish to highlight any of the important events that happen, you could do so by marking that particular card as a key event.
Here is how to add a key event on a live blog:
- Clicking on the star icon next to the particular card on your live blog makes it a key event.
- There aren't any limitations on the number of key events that can be added to a live blog. Any number of key events can be added to a blog.
- Key events would appear on the right corner below the blog's title.
-
When a card is marked as a key event, the title of the card and the time when the card is added shows up on the key events section on the front end.
Pinning cards to the blog:
- Important information that shouldn't be lost in the trail of cards added to the live blog, you can pin that card to the top.
- This can be done by clicking on the pin symbol next to a particular card.
- Pinning a card works similar to pinning comments on any YouTube video.
- The pinned card stays on top of the blog even after the live blog is closed.
Closing a live blog
When the live event you are covering is over, the live blog can be closed.
Closing a live blog re-arranges the cards in the chronological order in which they were added while the blog was created.
To close the live blog:
On the top right corner of the live blog click on the three-dotted menu and choose close.
Note
Once a live blog is closed, it cannot be re-opened.
How to Create and Configure Breaking News in BOLD CMS
1. What is Breaking News?
Breaking News refers to current or ongoing events of significant importance that are displayed prominently on your website — typically just below the header menu.
It allows you to instantly highlight urgent updates, headlines, or important announcements for your readers.
2. Where Can I Find Breaking News on the Website?
Breaking News usually appears just below the header menu.
(You can attach or embed the reference image here.)
3. How Can I Create Breaking News in BOLD CMS?
To create Breaking News:
- Login to BOLD CMS.
- Go to the Workspace Page.
- Click on Add → select Breaking News.
- You’ll be redirected to the Breaking News creation page.
- Or directly visit CMS-URL/breaking-news/new.
4. What Are the Types of Breaking News Supported in BOLD?
BOLD CMS supports three types:
- Breaking News with No Hyperlink – Displays only the headline, not clickable.
- Breaking News Linked to an Existing Story – Clicking redirects to a story already in CMS.
- Breaking News with Associated Story – Creates a new story while setting up Breaking News.
Note: Type 1 and 2 Breaking News will not appear in CMS search results, but Type 3 will.
For Type 3:
- Map the story to a section.
- Add a hero image and title.
- Ensure you’ve configured the default section in Settings → Configure → Breaking News → Breaking News Default.
5. Why Is My Breaking News Not Visible on the Website?
If Breaking News doesn’t appear:
- Check if the Breaking News collection exists and has the correct template (Breaking News) and slug (breaking-news).
- Ensure one item is ranked (click the ⭐ icon) and publish the changes.
6. How to Configure Breaking News from Page Builder?
To manage visibility and appearance:
- Go to Page Builder → General Settings.
- Under Visual, toggle Breaking News ON or OFF.
- In Header Layout, adjust:
- Speed of the ticker
- Text and background color
- Save and publish.