
Prerequisites: A Google Ad Manager account should be created at https://admanager.google.com/.
Setting up Google Ad Manager
We have to follow a sequence of steps to set up the integration between Google Ad Manager and Page Builder.
There are 4 important steps in the setup:
1. Create a new Ad unit.
2. Create a new order.
3. Create a line item.
4. Create a creative.
Let's go through each step in detail:
Creating a New Ad Unit
In Quintype, we have specific names mapped for ad units to ensure that ads serve properly on Quintype's platform. Here's how you can create/upload an ad unit:
1. Go to Ad Manager.
2. Click on "Inventory".
3. Click on "Ad Units".
4. Click on "New Ad Unit".
5. Add the details such as name, select size as Fixed size, and enter the size as ad unit of leaderboard, super leaderboard, or billboard as per the provided table.
6. Check the "Adsense" box if you want to render ads from AdSense.
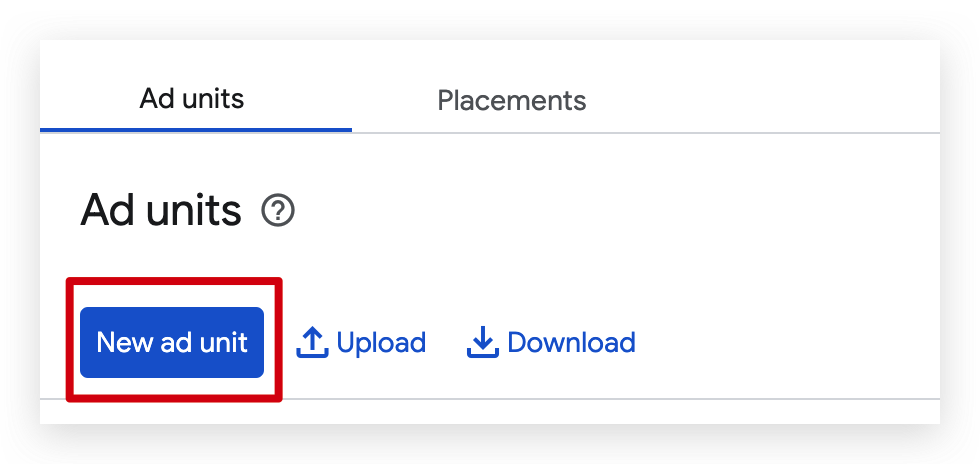
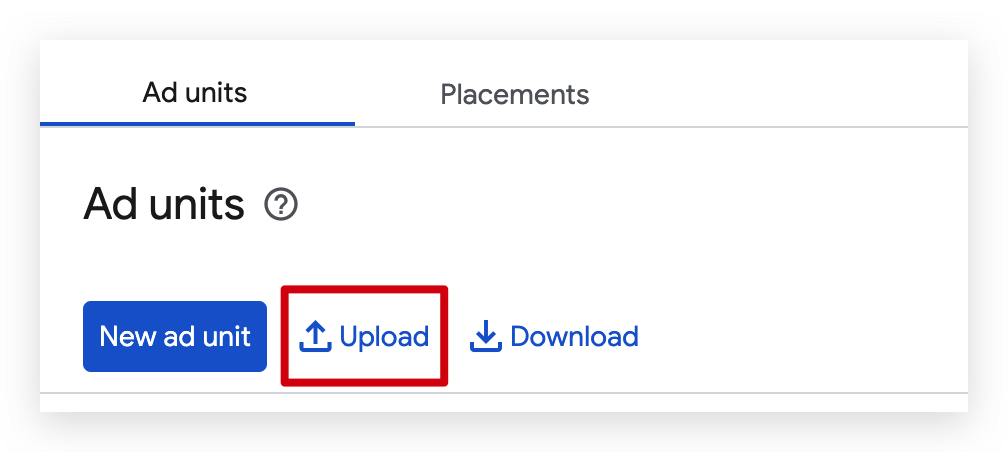
7. If you don't want to create ad units manually, you can upload the provided CSV file.
Creating a New Order
After creating/uploading the ad unit, you need to create a new order in Ad Manager. Follow these steps:
1. Go to Ad Manager.
2. Click on "Delivery".
3. Click on "Orders".
4. Create a new order.
5. Add new line items and creatives to the order.
Creating a Line Item
To create a line item, follow these steps:
1. Go to the order you just created.
2. Click on "New Line Item".
3. Select the ad type from Display or Video/Audio.
4. Enter the name of the line item and select the line item type as "Sponsorship".
5. Add the size of expected creatives.
6. Select the start and end time of the ads.
7. Under the "Add Targeting" section, click on "Custom Targeting" and select the publisher ID by adding the publisher ID value.
8. Save the changes.
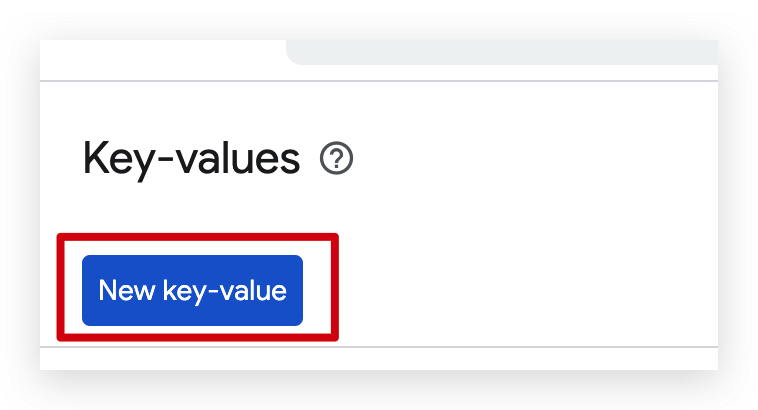
Note: To get Customer targeting details such as Publisher ID, Targeting ID etc in the Line item, you need to create “Key Value”.
Steps to Create Key Value:
- Go to Ad Manager> Inventory> Key-values.
- Click on “New Key-value” as shown in below image:
- Add name, display name and click on save to save the changes. Please note that name of key-value doesn’t support any special characters.
- You can create Targeting Value either while creating Key Value or while selecting custom targeting in the Line item.
Uploading Creatives
Now, it's time to upload the creatives for the line item. Here's how you can do it:
1. Go to the Creatives tab.
2. Click on "New Creative".
3. Select the creative type from the available options.
4. Add the name and upload the image.
5. Add the click-through URL.
6. Click on "Save and Preview".
Note: Make sure the images you add have the same size as the selected ad size.
Approving the Order
Once the creative is created, go back to the Orders tab and click on "Approve" to move the status of the order from Draft to Ready.
Adding the Network ID in Page Builder
To ensure smooth rendering of ads, you need to add the network ID of Ad Manager in Page Builder. Here's how you can find and add the network ID:
1. Click on "Admin" from the left-hand side in Ad Manager.
2. Click on "Global Settings".
3. Navigate to the "Network Settings" tab.
4. Look for a number under "Network Code". This is the network ID.
To add the network ID in Page Builder:
1. Go to Settings.
2. Click on "General Settings".
3. Go to the "Manage" tab.
4. Add the network ID under "DFP Network ID".
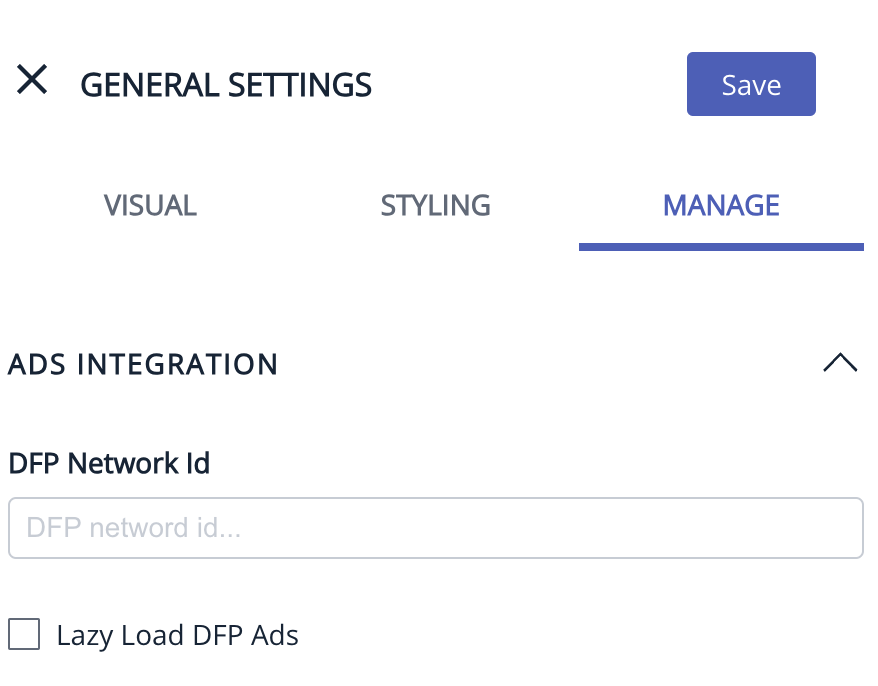
5. Save and publish the changes.
And there you have it! You have successfully integrated Google Ad Manager into Page Builder.
Defining an Ad Slots in Page Builder.
To target ads for PB publishers, the first step is to define an ad unit slot in Page Builder. This can be done on either the Home page or the story page. Here's how you can do it:
1. Go to Page Builder.
2. Navigate to the Home page or story page where you want to insert an ad slot.
3. Click on the "+" icon.
4. From the left-hand side "Layouts" dropdown, select "Ads".
5. Select the type of ad unit or ad dimension such as leaderboard, super leaderboard, billboard, or custom.
For more information on the Ad slots, please go to https://help.quintype.com/en_US/general-settings/integrate-ads
Setting up Ads in Google Ad Manager.
1. Go to Google Ad Manager and log in using your account credentials.
2. Navigate to Orders:
- In the left sidebar, go to Delivery → Orders.
- Click “New Order” to create an order. This step helps organize your ad campaigns under specific advertisers.
- Enter the advertiser's name and order details, which will help you track who the ad belongs to.
-
Click Add Line Item to create a specific ad placement within this order.
3. Configure Line Item:
A line item defines the details of how and where an ad will be displayed. Here's how to set it up:
- Ad Type: Select Display, as you’re setting up a visual banner or creative.

- Line Item Template (Optional): Use this if you have predefined templates for faster setup.
- Name: Enter the campaign name (e.g., Spring Sale Banner). This helps identify the campaign later.
-
Line Item Type: Select Sponsorship if you want this ad to take priority and show as often as possible.

-
Expected Creative: Specify the ad size (e.g., 300x250, 728x90). This ensures the right fit for the ad slot.
The supported sizes on the page builder are: - Leaderboard: 728×90
- Super Leaderboard: 970×90
- Billboard: 970×90
- Mobile Leaderboard: 320×50
4. Delivery Settings:
These settings control when and how often the ad appears.
- Start and End Time: Choose the exact dates and times for the ad to start and stop running.
- Adjust Delivery: Under this section, set Display creatives to As many as possible. This maximizes the ad’s visibility.

5. Set Targeting:
Targeting ensures the ad appears in the right place for the right audience.
Under Add Targeting, define where and how the ad will be served:
- Inventory: Select Run of Network to allow the ad to appear across all available ad slots, unless you want to target specific pages or sections.
- Once completed all the steps above, click on save.
Once added the line item, it will get the user to the line item page ( please refer to the screenshot below)

6. Add Creatives:
Creatives are the actual images or content of the ad.
- After saving the line item, go to the Creatives tab.
- Click Add Creatives → New Creative and select the appropriate ad size.
Note: Please ensure that the creatives you upload match the sizes we support on the page builder:

- Select Image: Upload the ad banner or graphic provided by the advertiser.

- Add Details: Enter the creative name, upload the image, and provide the click-through URL (the link users will visit when they click the ad).
- Click Save and Preview to ensure the ad looks correct and links properly.
7. Review and Activate:
Carefully review all settings, including targeting, delivery, and creative details.
- Click Save and Activate to start the ad delivery process.
- Once live, the line item status should change to Delivering if everything is set up correctly and there is available inventory for the ad.
How to Render an Ad More Frequently on the Frontend:
To increase the frequency of a specific ad appearing in a designated ad slot, follow these steps:
- Go to Line Items and select the ad that has been created.
- Navigate to the Creatives section and check the box for the desired ad.
- Click on Copy Creatives—this allows multiple creatives to be associated with the line item, increasing its delivery.

By following these steps, the selected ad will have a higher chance of rendering more frequently on the front end.
Set Targeting in Google Ad Manager:
-
Navigate to Add Targeting and click on Custom Targeting.

- Select the Publisher ID from the dropdown.
- Create a variable with the ad name as its value.
- Note: Ensure all characters are in lowercase.
- Click Save.

Now if you want the ad to render multiple times on the front you need to follow the simple below steps.
Configure Ad Slot in Page Builder:
- Log in to the Page Builder.
- Hover over the desired Ad Slot and click the Settings Gear icon.
- In the Targeting ID field, add the ad targeting ID created earlier.
- Save the changes.

This setup will ensure the selected ad renders in the specified ad slot.